Thursday, September 27, 2007

Cupcake Hero - Battle Lime!

So, here is my entry for my first blogging "competition" - held by Laurie at QuirkyCupcake. I didn't put too much pressure on myself this go round :) The ingredient for this month's all-cupcake contest is lime. Great choice! For my entry, I figured that I couldn't go wrong with chocolate and citrus, right? I bring you my entry - Chocolate coconut cupcakes with lime cream cheese frosting.

Thanks Laurie for starting this up - the challenge helps to inspire!
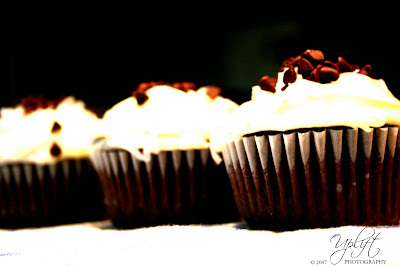
Chocolate Cupcakes (original recipe from Ina Garten; edited by me!)
Ingredients
1 1/2 sticks unsalted butter, at room temperature
2/3 cup granulated sugar
2/3 cup light brown sugar, packed
2 extra-large eggs, at room temperature
2 teaspoons pure vanilla extract
1 cup buttermilk, shaken, at room temperature
1/2 cup sour cream, at room temperature
2 tablespoons brewed coffee
1 3/4 cups all-purpose flour
1 cup good cocoa powder
1 1/2 teaspoons baking soda
1/2 teaspoon kosher salt
1/2 cup coconut
1/2 cup semi-sweet/bittersweet chocolate chips
Squeeze of lime juice

Steps
1. Preheat the oven to 350 degrees F. Line cupcake pans with paper liners.
2. Cream the butter and 2 sugars on high speed until light and fluffy, approximately 5 minutes. 3. Lower the speed to medium, add the eggs 1 at a time, then add the vanilla and mix well.
4. In a separate bowl, whisk together the buttermilk, sour cream, lime juice and coffee.
5. In another bowl, sift together the flour, cocoa, baking soda, and salt.
6. On low speed, add the buttermilk mixture and the flour mixture alternately in thirds to the mixer bowl, beginning with the buttermilk mixture and ending with the flour mixture. Mix only until blended.
7. Fold the coconut and chocolate chips into the batter.
8. Divide the batter among the cupcake pans
9. Bake in the middle of the oven for 20 to 25 minutes, until a toothpick comes out clean.
10. Cool for 10 minutes, remove from the pans, and allow to cool completely before frosting.

Lime Cream Cheese Frosting!
Ingredients
1/2 pound cream cheese, at room temperature
1 stick unsalted butter, at room temperature
1/2 teaspoon pure vanilla extract
Confectioners' sugar, sifted (amount dependent on the amount of lime juice)
Lime juice (amount depending on how sweet/tart you like it!) and ~ 1 tsp of lime zest
Coconut and mini-chocolate chips for topping

Steps
1. Mix cream cheese and butter together.
2. Add vanilla.
3. Add lime juice (start with juice from 1/2 lime), zest and sugar (start with 1 cup)
4. Add more lime juice and sugar depending on taste and consistency - you want it to be thick and hold its shape (add more sugar if not thick enough).
5. Top with coconut and chocolate chips!

Notes
1. I like my frosting really tangy, so I added a significant amount of juice - it was delicious but definitely go in stages because you can't take it out!
2. I loved the frosting and liked the cupcakes - they were great right out of the oven, but after a few days, the insides were a bit dry and crumby. I think it may be a result of my using 2 large eggs instead of 2 extra-large eggs. Next time, I will try to make the cupcakes a bit more moist.
3. Did I mention that the frosting tasted amazing :)?

Wednesday, September 26, 2007

Love these - New Gifts from Around the Web!

Just shopping around the web - here are a few of my favorite new finds...


[from left to right] (1st row) Dinnerware (price varies): Crate & Barrel; Dessert Plates ($12 each; different designs): Anthropologie; Necklace ($35): Etsy seller: vintaj; (2nd row) Recycled glasses ($40 for a set of 4): Green glass; Lotus bowls ($79): Zanisa; Kitchen towels ($18 for a set of 4): Etsy seller: MichelleBrusegaard

Tuesday, September 25, 2007

Dinner + Dessert

Usually when I bake, I use a recipe and when I cook, I don't. Either I modify recipes or I pull together my own recipe. Since I don't usually write down my exact ingredients - most of my recipes (non-dessert) are approximate.

Tonight I made a fresh, chunky style tomato sauce and ravioli, with roasted vegetables. Since dinner was so easy, I decided to try out an apple recipe (we went apple-picking last week and I have about 2-3 dozen apples on my counter, but that's for another post).

Fresh Tomato Sauce
Ingredients
1 1/2 sweet onions, chopped
4 cloves of garlic, minced
4-5 ripe tomatoes, chopped
1-2 tablespoons extra virgin olive oil
Kosher salt/freshly ground pepper
Splash of chicken broth
Handful of fresh basil/parsley, chopped

Steps
1. Saute onions and garlic in olive oil until translucent
2. Add tomatoes; bring mixture to boil, then reduce heat to low-medium
3. Add chicken broth and allow sauce to reduce approximately by half
4. Add chopped herbs and season to taste
5. Sauce takes about 1/2 hour to cook; the consistency should be chunky and not too liquidy

Roasted Vegetables
This recipe is a standard in our house - we make it with every kind of vegetable. It's very easy - almost a "set it and forget it"-type recipe.
Ingredients
Vegetables (whatever you prefer; the best ones that I've found to use are asparagus, red onions, carrots, broccoli, cauliflower, squash, potatoes, red peppers, tomatoes, etc)
Few cloves of garlic, crushed
Extra virgin olive oil
Kosher salt/freshly ground pepper
Grated parmesan (optional)

Steps
1. Preheat oven to ~400-425 degrees
2. Cut up veggies (not too small or they will crisp too soon) roughly the same size and put on parchment-paper lined sheet pan (I prefer a jelly roll type pan but any baking sheet with a lip will do)
3. Add olive oil to veggies - amount depends on size of pan, how many veggies, etc - the oil should lightly coat or be touching some part of each piece. No need to go crazy with the oil - during baking, you can always add more if it seems as if the veggies don't have enough cooking liquid
4. Add s/p - this is key to bring out the flavor. I usually just lightly sprinkle each on all areas of the baking sheet
5. Bake approximately 30 minutes - or until the vegetables are tender and the edges are brown and a bit crispy. Time is very approximate - really based upon what you use (e.g. asparagus is usually much less than this - more like 15-20 minutes).
6. Sprinkle with grated parmesan - optional (but tasty!)

Apple-Oatmeal Bars (Recipe: Cooks.com; my changes are in yellow)
Ingredients (I halved the recipe and fit into an 8x8 pan)
1 cup flour
1/2 tsp. salt
1/2 tsp. baking soda
1/2 tsp. cinnamon
1 1/2 cup quick oats
1/2 cup butter
1/2 cup sugar
1/2 cup brown sugar
2 1/2-3 cup chopped apples (I used Golden Delicious)

Steps
1. Sift flour, salt and soda together.
2. Add brown sugar and oats. Work in butter.
3. Grease a 8x8 inch pan and spread mixture on the bottom.
4. Spread apples on and sprinkle with sugar and cinnamon mix.
5. Bake at 350 degrees for 35 minutes.
6. Cut into squares and serve warm with cream or ice cream, or cut and serve like brownies.

I could get used to this...

I had to work late on Monday, so Tim cooked his first dinner in our new place. Tim is a great cook, but doesn't get to show off his skills very often since I'm always in the kitchen. His menu was amazing (he even researched recipes!)! Filet mignon with sauteed mushrooms in a white wine reduction, roasted rosemary potatoes and broccolini.

What a guy, I think I have to work late tomorrow too...

Monday, September 24, 2007

Foodie Blogroll - Newest Member :)

I just joined the Foodie Blogroll - started up by The Leftover Queen, the blogroll is host to a number of really cool food-related blogs. Check them out by scrolling through the list in my sidebar. If you are interested in joining, find more info here.


Weekly Menu - Slacker

I slacked on my weekly menu for last week, but I will attempt to get back into it this week...tomorrow :)

Happy Fall!

Sunday, September 23, 2007

The Best Banana Bread...

according to Cooking Light and my mom! I made this bread a few years ago when it was featured on the cover of Cooking Light. It was just featured again in their September issue - "The Best of" their recipes from the last 20 years.

Coconut Banana Bread with Lime Glaze

Ingredients

Bread
2 cups all-purpose flour
3/4 teaspoon baking soda
1/2 teaspoon salt
1 cup granulated sugar
1/4 cup butter, softened
2 large eggs object
1 1/2 cups mashed ripe banana (about 3 bananas)
1/4 cup plain low-fat yogurt
3 tablespoons dark rum
1/2 teaspoon vanilla extract
1/2 cup flaked sweetened coconut
Cooking spray
1 tablespoon flaked sweetened coconut

Glaze
/2 cup powdered sugar
1 1/2 tablespoons fresh lime or lemon juice

Steps
1. Preheat oven to 350°.
2. Lightly spoon the flour into dry measuring cups, and level with a knife. Combine the flour, baking soda, and salt, stirring with a whisk to combine.
3. Place granulated sugar and butter in a large bowl; beat with a mixer at medium speed until well blended (about 1 minute). Add the eggs, 1 at a time, beating well after each addition. Add banana, yogurt, rum, and vanilla; beat until blended.
4. Add flour mixture; beat at low speed just until moist.
5. Stir in 1/2 cup coconut.
6. Spoon batter into a 9 x 5-inch loaf pan coated with cooking spray; sprinkle with 1 tablespoon coconut.
7. Bake at 350° for 1 hour or until a wooden pick inserted in center comes out clean. Cool 10 minutes in pan on a wire rack; remove from pan.
8. Combine powdered sugar and juice, stirring with a whisk; drizzle over warm bread. Cool bread completely on wire rack.

Note: Sometimes, I pour another batch of the lime glaze over the bread once it is cooled. I've tried a bunch of other banana bread recipes, but this is one is the best! Also, try added chopped walnuts or pecans to the batter....

Honeymoon Video!

Monday, September 17, 2007

Cheap & Beautiful

I love flowers. I like to have them in my house as often as possible - I know they are typically a waste of money because they die so quickly but I still love to have them, arrange them - different flowers (I like tree branches, vines, and weeds too!), different containers, and different styles. Better Home and Gardens put out a cool article on Grocery Bouquets - or how to arrange easily-available flowers into beautiful home or event arrangements. It got me thinking about how to make different kinds of "bouquets" - Here are a few ideas:
One-Blossom - creates a central impact
(photo: BH&G)

Skyline - creates a visual line down the table
(photos: BH&G [top], Martha Stewart [bottom])

Fresh - Use materials from around the house as the main "flower" or for added excitement to the bouquet (photos: [top & bottom] Martha Stewart)

There are a lot of great stores/websites to find cheap containers to get creative with - a few of my favorites are:

Wednesday, September 12, 2007

Oh, we love chili...now.

In my family, chili is not something that is popular - we are not a family of tailgaters, or football sundays (more baseball - go Yankees!), or potlucks. I never grew up with Mom making a pot of chili, so I'm not sure what possessed me to make this chili recipe a few years ago. We usually host an "open house" type party on Christmas Eve and I guess I thought this would be an easy dish to have out and people could serve themselves. I made it a few weeks earlier and it turned out to be a total hit and the rest is history :) It is commonly requested by my mom, my husband, and the rest of the (recipe-critical) family.


I based my recipe off this recipe from Emeril Lagasse. Instead of posting the entire recipe below, I'm just going to post my edits to the ingredients (the process is essentially the same since its really a chop, drop and cook-type recipe).


Jade's Ingredient List
2 tablespoons vegetable oil
2 cups chopped onions
Salt
Cayenne
~ 1 lb diced beef (usually top round; must be cut small in order for it to be tender)
1 package ground turkey (93% lean; I don't usually use the 99% lean because it can tend to be dry)
2 tablespoons chili powder (spices are really to taste; I prefer a lot of chili powder and cumin)
2 teaspoons ground cumin
1 teaspoon garlic powder
Crushed red pepper
2 teaspoons dried oregano
2 tablespoons chopped garlic (could use more!)
3 cups crushed tomatoes
1/4 cup tomato paste
2 cups beef stock (or whatever kind you have; I used homemade veggie)
2 tablespoons Wondra (I find that you don't always need this step; usually thick enough)
4 tablespoons water
1 can chick peas
1 can black beans
2 ears fresh corn (off the cob; you can also use frozen)


Note: you could really add whatever kind of beans (or amount) that you like; I usually use whatever I have in the house.

Memory Walls - What's old is new again?

The idea of a "memory" wall or multi-frame layout has been out there for awhile, but I just came across some new and cool ideas from Pottery Barn. They have a new section on their website called StyleHouse, where they explain the how-to's behind certain home decorating accents and ideas. They provide downloadable templates for 5 different memory walls. Here are a few examples:


I also saw a few cool ideas for memory-type walls, or just "idea" walls at poppytalk. Check this one out - I think I'm going to put it up in my office, but maybe use binder clips at each end to avoid curling...

Tuesday, September 11, 2007

Reusable grocery bags

My husband and I are a huge fan of reusable grocery bags - we have been using them since 2004. We traveled to New Zealand and saw them in grocery stores there for about $1 each (unlike the US where only the canvas bags were starting to gain popularity for about $5-$8 each, if you could even get them in the grocery stores). We brought 6 home with us and have used them ever since. These are the bags that we bought in NZ (photo: wikipedia):

When we were planning our wedding, we incorporated some "green" elements into the wedding and we also wanted to find a favor that was related but also one that people would actually use. We chose the reusable bags - and they....were a HUGE hit! All of our relatives (old, young, and in-between) loved the bags, asked for more, and are still telling us how much they like and use them. The company that we used was the same company that made the bags we bought in New Zealand - The Green Bag Company - they have since expanded into several countries, including the US (office is in SF, but they ship anywhere). Here are a few pics of the bags from our wedding!


Besides green bags, there are a lot of other, really cool (even fashionable) options in reusable bags (some even made from recycled materials)! I just saw this awesome bag posted at design*sponge -- by artist Hayley Waring.

A lot of supermarkets in our area (NYC metro area) are now carrying all kinds of bags for about $1 - can't beat it! Great for groceries or whatever (I used them to carry my work to lunch, my laptop, recycling, beach towels, etc.) - you even get money back at some grocery stores (not that that 2 cents per is doing a lot for my grocery bill, but its the point that matters :)

Weekly Menu 9/10-9/14

I realized that I don't include the weekends in my weekly menus....I should probably start doing that, but for this week, only M-F will be included. I think most people have the hardest time getting a weekly menu together for M-F (me, especially) due to all the millions of weekday obligations.

Last week I did ok - I did not deviate from my menu, but I didn't make everything on the list either. Thursday I forgot that I had a hair appt so I was not home to cook - we ate leftovers (which is still within the realm of my "trying to use whats in my fridge" trial) and Friday we ended up going out to eat because I got hired to shoot a local sports event and was not home to cook.

So, on to this week (its already Tuesday - oops!)

Monday: Potato-crusted chicken with orzo and sauteed broccolini (sounds complicated but I just made it up with ingredients from the fridge)
Tuesday: Chili!
Wednesday: Hopefully, quesadillas with the leftover chili, but maybe I can come up with something more creative
Thursday: Chicken-spinach roulades (supposed to make last week!) and baked/roasted cauliflower (maybe)
Friday: ?? Still up in the air as ideas are coming to me in limited supply today....I'll have to update later.

And...I just have to add this cute picture of one of my nieces from this past weekend!

Monday, September 10, 2007

Stock or Broth?

Either way, I use a lot of it. I replace water, oils, and other liquids in recipes with stock or broth. I usually buy a low-salt broth, but I had been meaning for awhile to try to make my own. How hard could it be? Something about saving chicken carcasses in my freezer turned me off, so I started with a vegetable stock.

According to Cooking Light, a broth is basically made from the same ingredients as a stock. However, broth is cooked in less time, isn't as intensely flavored, and often contains more sodium. Interesting, so I guess I made a stock.

After reading a number of recipes online and saving vegetable ends and scraps for a few weeks, I decided to just go for it. How bad could it be?

I used:

Celery (w/leafy tops), carrots, baby bella mushrooms, parsley, a bunch of different onion pieces, zucchini, a can of diced tomatoes (w/juice), garlic (few cloves, crushed), dried mustard seeds, some fennel seeds, couple of bay leaves and a few other spices.

I added all those vegetables to about 16 cups of water - brought it up to a boil and then simmered it for about 4-5 hours. It came out as a rich, deep-colored broth, had a nice taste - I was happy with it for my first try. Next time, I think I will leave out the zucchini - or put a bit less, since the flavor of it was a bit too strong.

If you don't want to wing it :), here are a few recipes from around the web:

Cooking Light Vegetable Stock
Allrecipes Vegetable Stock Tutorial
Epicurious Vegetable Stock

I froze my stock in 1-2 cups increments - it was awesome to pull some of my own stock out of the freezer to use for dinner tonight!

Spell with Flickr

Ok, so maybe I'm late on this one...but its new to me! I think this is such a cool program - I can't remember where I first heard about it, but here is the link to Spell with Flickr, created by Erik Kastner (check out his blog here). You type in a word and the program searchs Flickr to find images of the letters in your word - you can change any of the specific letters until you find a combo that you like. You could use this for so many things! Merge with your own photos to make a great framed photo for your house or have the words by themselves in your kitchen or in a travel album or for cards....just make sure you get the correct permissions and read the community use rules here.

Here are a few examples of words that I made...

L O V squircle E

N Y C

Boggle Letter J A D-lights! E
(all photos from Flickr; photo combinations created here)

This could also be done with signs from your neighborhood (although its much easier to get them from Flickr). Just snap some photos, edit to the same shape and merge in a program like Photoshop or even MS Powerpoint.

Thursday, September 6, 2007

Pasta, Pesto, & Peas + Protein!

The original recipe for this dish came from Barefoot Contessa's Pasta, Pesto and Peas recipe. My current dish is really nothing like it - I make my own pesto (see recipe below) and really only use a few of the listed ingredients and I prefer to add a protein. If you love pesto, this is a great and super-easy dish (especially if you use store-bought pesto to make your life easier).

Ingredients:
Pesto (~ 1/2 cup, but its really to taste)
Pasta, any type is fine, ~ 1lb
Frozen peas, 1 bag (I use the petite variety from Trader Joe's)
Parm cheese (grated), handful
Chicken breasts, cooked and chopped, ~ 1lb (or more is fine)
Kosher salt, to taste

Directions:
1. Boil water for pasta
2. Add pasta - cook al dente
3. Drain (fine to leave a bit of pasta water in there); in the same pot, add pesto (to taste - acts as sauce), peas, and cut up chicken. Mix.
4. Add in handful of parm cheese. Salt, to taste.
5. Garnish with fresh basil, if desired.

Notes:
You can make the chicken for this dish in a number of ways - grilled, breaded and cooked in the oven, or sauted on the stove (this is how I do it). I use thin-sliced chicken breasts, season with s/p and whatever spices I have on hand and saute in frying pan with a bit of olive oil and chicken broth. Really, any type of chicken will work - leftover chicken would be great and easy.

Pesto - any pesto that you like will do. I make my own because I have not found a store pesto that I like. My recipe is very simple - the proportions are approximate and really to taste - but I use about 1 bunch of basil leaves, 1-2 cloves fresh garlic, handful of parm cheese, small handful of walnuts/pine nuts. Combine in food processor and then drizzle in extra virgin olive oil until it forms a smooth paste. Salt to taste.

Enjoy!

Flea Markets?

Does anyone shop at flea markets? My mom was an antiques dealer for most of my life, so I grew up at flea markets and antiques shows and have an appreciation for collectibles and interesting aged items. My husband and I checked out one of the more famous flea markets in the northeast this past weekend - Stormville Airport Flea Market. There were a ton of things to be found! I collect cool bowls - but there were tons of items like stone urns, furniture, old glassware - all great things to make flower arrangements or decorative items for the house. It always makes me eager to get started on a "project" when I see all that kind of stuff. I almost bought a few old hankerchefs to try to make a quilt on my new sewing machine. I should probably learn how to put it together and turn it on first though :)
Here are a few pictures of the things to be had....

Gift for the Cook!

This is a really cool new offering from RedEnvelope - 24 specialty salts in their own organized case. Granted at $165, its really expensive, but its really neat (I mean, especially, how annoying would it be to track down all those salts and organize them so perfectly).

Click HERE to know everything you wanted to ever know about salt from the Culinary Salt Glossary. If you had these salts, you could make the awesome dish they serve over at SushiSamba - tempura rock shrimp with 5 salts. I did buy black sea salt from Trader Joe's for about $2.99 - does anyone know where to get any of these cool accent salts for a decent price?

Wednesday, September 5, 2007

Newlywed Gift Idea

Looking for a great gift for newlyweds? For my wedding, one of my bridesmaids gave us a great cookbook from Williams-Sonoma.

Its $35 - which is not terrible - and its really full of good recipes. If it wasn't called "Bride & Groom" cookbook, it would be great for anyone. Besides a bunch of really good salads, soups, entrees, appetizers and desserts, it also has a section on standards - like how to make mayo, basic vinaigrette, pizza dough, chicken stock, etc.

BBQ Chicken Pizza

This is a recipe that I have been making for a few years - there are several variations depending on what pizza crust you use, toppings, types of cheese, type of BBQ sauce, etc., but the general result is the same. Its really delicious and a crowd (and husband) pleaser :)

Ingredients:
Note - no amounts really for any one ingredient because is all depending on how heavy or light you like your toppings!

BBQ sauce (homemade or bottled [I prefer Bone Suckin' Sauce or KC1 Masterpiece Original])
Pizza crust (I've used homemade, from a pizza shop, Pillsbury, Boboli, and Trader Joe's)
Mozzarella cheese (fresh or shredded is fine)
Red onion, thinly sliced
Chicken breasts, ~ 1lb. cut into small pieces
Pineapple (can be fresh or canned chunks)
Red pepper, thinly sliced (optional)
Cilantro, chopped (optional)

Directions:
1. Preheat oven to 425 degrees.
2. Let dough come to room temperature; get your pan ready. I use a jellyroll-type pan (what I use all the time) lined with parchment paper (to eliminate need for cooking spray or greasing; click HERE for a free sample offer). Dough can be any shape you like - it can also be as thin or thick as you like. I tend to prefer it thinner so it produces a cruncy crust. I also leave about 3/4 inch "edge" that is a bit thicker than the rest of the dough for the crust.
3. Coat the bottom of a saute pan with cooking spray or oil; add chicken. I also season my chicken with a bit of garlic powder and pepper but this is not necessary. After it is about halfway cooked, add about 1/4 cup BBQ sauce or amount desired. Cook through and shut off heat.
4. Add a few tablespoons of sauce to bottom of dough as "sauce."
5. Just add toppings - add chicken, pineapple, red onion, red peppper - as much or as little of these as your like will work. You can add other things as well if you like.
6. Top with cheese - again, as much or as little as you like.
7. To finish - I spray or drizzle some olive oil on the edge of crust and dust with garlic powder.
8. Cook for about 10 minutes or until the cheese is melted and sauce is bubbly. Remove from oven and cut into desired shapes. Garnish with cilantro if desired.

Tuesday, September 4, 2007

Weekly Menu: 9/3 - 9/7

Ok, I'm a blogging machine today :) Must have been all that long-weekend sleep.

Anyway, I'm going to try to start posting (and sticking to) a Weekly Menu. Its my attempt to try not to waste any ingredients already in my fridge and take advantage of local sales, coupons, etc - sort of similar to Robin Miller's Food Network show but not as excessive (I have no idea how she makes 3 meals out of 2 pieces of chicken!). Here is my current menu - I'll post at the end of the week to see how I did.

Monday - Asian-spiced BBQ ribs, salad with lemon-dijon vinaigrette
Tuesday - BBQ Chicken pizza (using leftover homemade BBQ sauce)
Wednesday lunch - if enough leftover, potentially make BBQ Chicken quesadillas for lunch
Wednesday - Mini-meatball soup (already chopped celery/carrots; leftovers good for lunch)
Thursday - Chicken-spinach roulades, some type of orzo/rice, roasted cauliflower
Friday - Chicken, pesto, & peas (pasta dish; made fresh pesto over the weekend) or Italian quesadillas

This is sounding ambitious...

Cakejournal

Just wanted to point out a good resource site for cake techniques, recipes, tools, and such. Cakejournal.com is a blog by a baker out of Denmark - she has great step-by-step instructions and tutorials for a ton of complicated procedures. One of her latest entries - How to make poured fondant icing - is awesome! I also love this -- she made a cookie to represent her RSS feed logo - too cute.

photo: www.cakejournal.com

Good looks for cheap

...or reasonable, anyway.

Check out this furniture (and many, many other home items) from CB2 (a new site from Crate & Barrel). It seems on par with Ikea but maybe, a bit more style-minded. I love this table and chairs - too cute for a small kitchen.
The lighting featured in this ad ($30) is great - especially love the colors (chocolate brown and rust) and the use of them in a row.
These glasses are great too - $20 for a set of 6. Would make a great gift too.

For those located in NYC - the SoHo store is opening in September....!

Monday, September 3, 2007

Let them eat cake!

While I'm writing this post, I'm actually eating a piece of the awesome cake that I made this weekend (recipe courtesy of Ina Garten). I'm always a bit hesitant making a cake because they are such a one-shot deal; I usually make a tart or cupcakes, muffins, cookies - maybe its an illusion, but they seem easier to me. Anyway, I bought fresh peaches at the store on Saturday and thought they would be perfect in a cake. I found a recipe for Ina's Plum Cake "Tatin". I substituted peaches for plums and sliced them instead of halving them. Both my husband (who usually doesn't like dessert without some type of chocolate involved :) and my mom gave it the thumbs up. I'll definitely be making it again!

Cake in progress, before batter is poured on top:


Final result:


Ina also has a recipe for Apple Cake "Tatin" - which is the exact same recipe with apples, instead of plums. I think that pears would also be great with this cake.

Before I made the cake, I read the reviews on Food Network website - most of them were comments about cooking the sugar. I just made sure that I watched it so it didn't burn and didn't let it get too brown.